WikiTraccs Hotspots
This article covers topics that are often hotspots in a demo or while evaluating WikiTraccs as migration tool.
You need the following at hand in this guide:
Note that all of the above is mentioned in the quick start video below.
Note: Some public Confluence instances for testing are lf-hyperledger.atlassian.net/wiki and https://wiki.unece.org.
Let’s dive in.
Click to open the WikiTraccs download page: DOWNLOAD page.
Download the zip file.
Extract the zip file - it contains two folders WikiTraccs.Console and WikiTraccs.GUI.
In the WikiTraccs.GUI folder run WikiTraccs.GUI.exe.
Windows might block WikiTraccs.GUI.exe from running, showing a blue warning message. This message shows because the file has not been signed. Unblock the file:
(*) If the Unblock button or option is not present, the file is not blocked.
A blue-ish window opens. We’ll call this just WikiTraccs for the remainder of this page, instead of WikiTraccs.GUI.
Congratulations, you downloaded and started WikiTraccs.
Proceed with the next step.
The window you opened in the previous step should look like this:
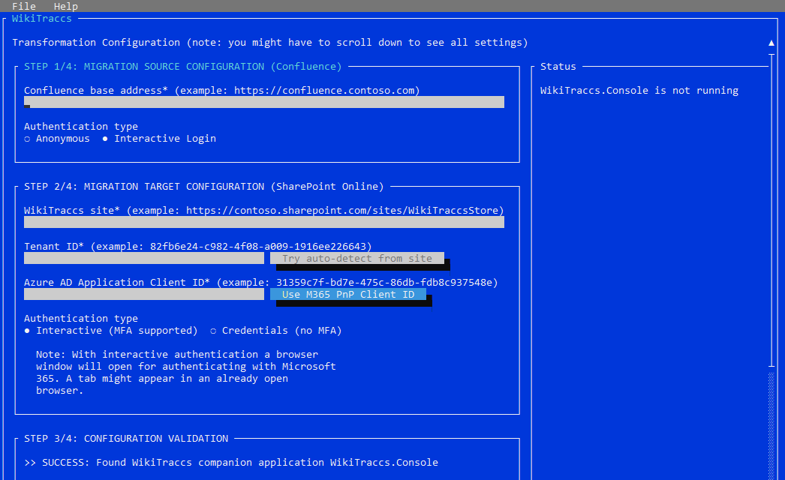
WikiTraccs main view
You will now use this view to configure everything for a first migration.
Select the Confluence base address input field and enter the base address of Confluence. This is the source system whose content will be migrated to SharePoint Online.
Under Confluence authentication type select the authentication type to use. Choose Anonymous to have WikiTraccs access Confluence as anonymous user. Choose Interactive login instead to open a browser window for logging in when starting the migration. Choose Personal Token to use a Personal Access Token (note: available as of WikiTraccs v1.13).
Select the WikiTraccs site input field and enter a SharePoint site address. Now is a good time to create this site.
Select the Try auto-detect from site button to detect the tenant ID. If this doesn’t work enter the tenant ID manually into the Tenant ID input field.
Select the Azure AD Application Client ID input field and enter the ID of the Entra ID application that WikiTraccs should use to access SharePoint.
Read the blog post Registering WikiTraccs as app in Entra ID for step-by-step instructions.
Refer to Authenticating with SharePoint for more general information.
Under SharePoint authentication type select the authentication type to use. Choose Interactive (MFA supported).
Proceed with the next step.
Choose the Test Confluence connection button to test the Confluence connection.
With the Anonymous and Interactive Login authentication types, WikiTraccs will open a browser window and automatically navigate to the Confluence base address you entered in step 1. Log in, if you chose Interactive Login as Authentication type in step 1.
Wait for the browser window to close. This is important. It has to close by itself.
A message box in the blue WikiTraccs.GUI window will open and tell whether the test succeeded or not.
Choose the Test SharePoint connection button to test the SharePoint connection.
WikiTraccs will show the default Microsoft 365 login experience in any open browser window it finds, or open a new browser window. Select this browser window and log in. A green bar should appear, saying Authentication complete.
Now select the blue WikiTraccs.GUI window again, bringing it back to the front.
A message box will open and tell whether the test succeeded or not.
When both of those tests where successful, select the Prepare WikiTraccs site and update space inventory button. You might have to log in again.
If successful, a message box will open and show you the number of Confluence spaces that were found.
Proceed with the next step.
First, you need to select the Confluence spaces to migrate.
Choose the Open space inventory to choose source spaces button.
A browser window opens, showing the space inventory SharePoint list. It contains information about all spaces that were found in Confluence. WikiTraccs filled this list when you selected the Prepare WikiTraccs site and update space inventory button in the previous step.
For each element in the space inventory list, choose the RequestTransformation option to include this space in the migration:
Include a Confluence space in the migration.
When you are finished, return to the WikiTraccs window.
Select the Target site input field and enter the address of the target SharePoint site. This site will be the new home for migrated pages. Now is a good time to create this site.
You can configure one default target site in the WikiTraccs.GUI user interface.
Additional target sites can be configured in the Confluence Space Inventory. The default will be used as fallback if a source selector has no target site set.
Configuring a different target site per space is possible via the WT_Setting_TargetSiteRootUrl column of the space inventory list. See How to map Confluence Spaces to SharePoint Sites for more information.
Select the Start transformation button to start the migration.
A new window opens - WikiTraccs.Console - and the migration begins.
Congratulations. Your first migration is running.
Look at the Site Pages library of your target SharePoint site. After a minute or so new pages should appear. Those are the transformed Confluence pages.
This article covers topics that are often hotspots in a demo or while evaluating WikiTraccs as migration tool.
This article covers the trial version of WikiTraccs and how it’s different from the licensed (full) version.