Refer to the following articles for topics around installing and updating WikiPakk.
This is the multi-page printable view of this section. Click here to print.
WikiPakk Installation and Ops
How to install and update WikiPakk
- 1: Install WikiPakk
- 2: Update WikiPakk
- 3: Update WikiPakk (staged)
- 4: Check the Current and Available Version of WikiPakk
- 5: Rolling back an update of WikiPakk
- 6: WikiPakk Configuration
- 6.1: Use a Configuration Site
- 6.2: How to use the settings list and move the page tree button to the left
- 6.3: Applying Custom Styles
- 7: Inventorize WikiPakk
- 8: How to Set Up Telemetry
1 - Install WikiPakk
How to install WikiPakk
Installation of WikiPakk
The WikiPakk solution has to be installed once in the SharePoint tenant before WikiPakk can be added to SharePoint sites.
WikiPakk is installed via the Microsoft Store AppSource.
After installing the WikiPakk app to the SharePoint tenant, it can be added to SharePoint sites by the respective site owners.
Note
WikiPakk is called “WikiTraccs WikiPakk” in the app store and when installed in SharePoint, due to historical reasons. But it is commonly referred to as WikiPakk.Installation via Microsoft AppSource
The following video covers two topics:
- installing the app via Microsoft AppSource to the SharePoint tenant
- adding the WikiPakk app to a SharePoint site
Watch:
Note
The app needs to be added once to the SharePoint tenant app catalog.Required Permissions
You need to be either SharePoint administrator or have administrative rights on the tenant app catalog site to install the app right away. If you aren’t an admin, you can request the app to be installed and an administrator has to confirm this later.Note
WikiPakk is a SharePoint Framework Solution (SPFx), not a browser plugin.After adding the app
Head over to the video section on the WikiPakk website to learn more about WikiPakk.
2 - Update WikiPakk
How to update WikiPakk
Updating WikiPakk
WikiPakk currently does not automatically check for updates, and neither does SharePoint. New versions can be discovered manually via AppSource.
Checking for a new WikiPakk version on Microsoft AppSource
You can see the latest version of WikiPakk in AppSource on this page: Details + support.
In AppSource there will also be a changelog showing the changes per release:
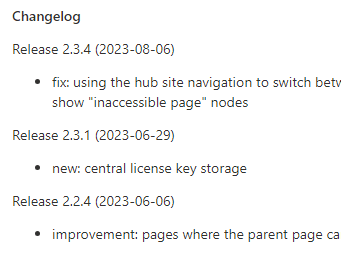
Changelog of WikiPakk as shown in AppSource
Updating WikiPakk in SharePoint
There are two steps to updating WikiPakk:
- the SharePoint tenant app catalog needs to be updated with the newest version from AppSource
- SharePoint sites that use WikiPakk might need to be updated to use this new version
The following sections describe those steps.
Update the SharePoint tenant app catalog
Permissions
You’ll need SharePoint Administrator permissions to follow below steps.As SharePoint administrator, open the tenant app catalog as follows:
- in a browser, open the SharePoint admin center
- in the left navigation, select More features
- on the right side, several options to choose from appear; look for the Apps section and select Open:
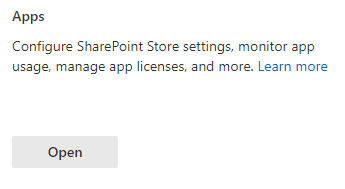
Entry to the SharePoint tenant app catalog.
- the SharePoint tenant app catalog should show a previously installed version of WikiPakk:

WikiPakk, installed from AppSource, showing version 2.3.1.
- Switch to the classic experience by selecting the classic experience link:

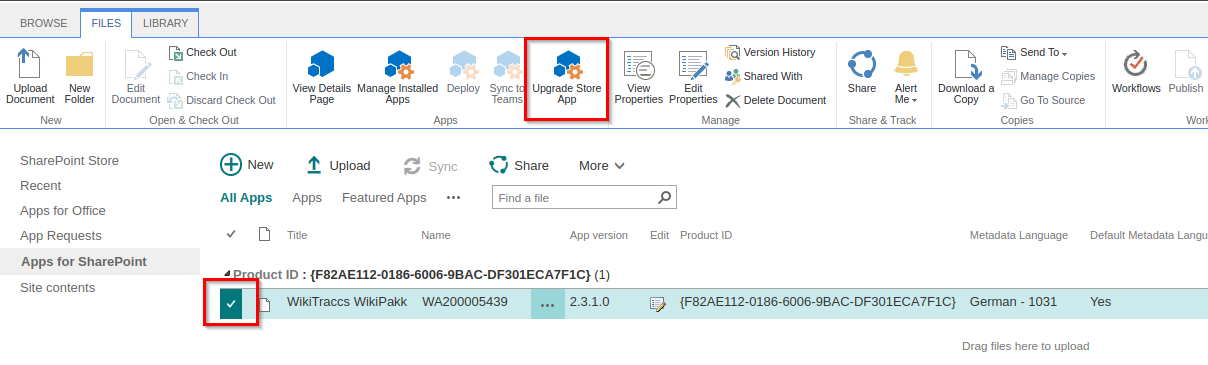
- In the classic experience, in the list of apps, select the WikiTraccs WikiPakk app
- At the top of the page, select the FILES tab to expand the ribbon menu (note: only if the ribbon menu is not yet visible)
- In the ribbon menu, select Upgrade Store App:
You will be redirected to a screen that displays Downloading from: https://addinsinstallation.store.office.com/appinstall/….
Once the file has been downloaded, you will be prompted to trust WikiTraccs WikiPakk:
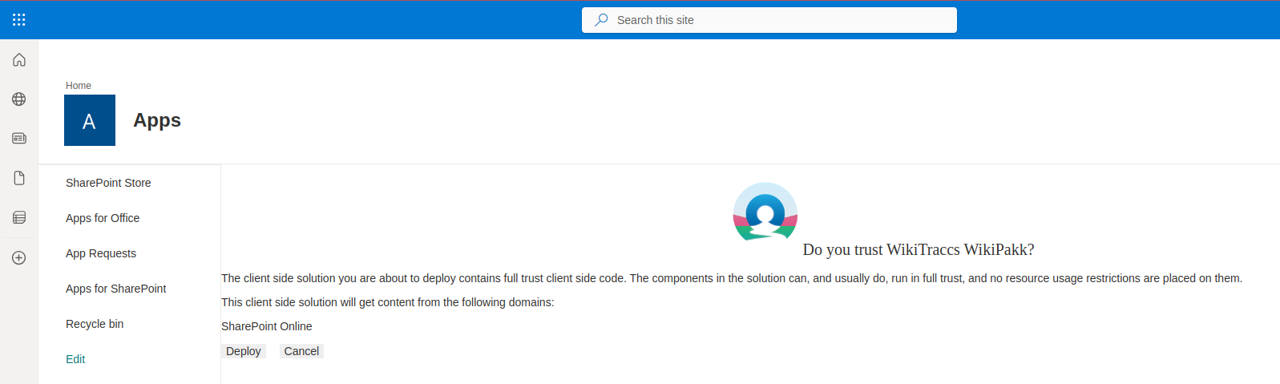
- Choose Deploy and wait; it might appear that nothing is happening for up to 20 seconds
Once the update has been completed, you should be redirected to the app catalog and the App version number should match the version number listed in AppSource.
Now the new app version is ready to be used in SharePoint sites.
Update WikiPakk in SharePoint sites
Permissions
You’ll need Site Owner or Site Collection Administrator permissions in the sites you are updating.In SharePoint, an app can have different versions in the tenant app catalog and in sites that the app had been added to.
The previous section described how to update the app from AppSource via the tenant app catalog. This app version is now higher than in the sites that use the app. We need to update those sites as well so they use the latest version.
Often You Can Skip This Per-Site Update
You only need to update WikiPakk in SharePoint sites if there have been new web parts added, or if the changelog says that this is necessary.
In most cases it is not necessary to update WikiPakk in sites, although it doesn’t hurt.
This has a technical background. SharePoint client-side apps (SPFx solutions) load their resources (HTML, JavaScript, CSS) from the SharePoint tenant app catalog site. Those resources are updated with each new WikiPakk release and installing this new release to the tenant app catalog is all it takes to properly update WikiPakk.
Only when the WikiPakk manifest changes (things like app title, but also embedded resources like SharePoint lists, fields, or content types), the app needs to be updated in each site for those changes to be applied to the site.
The changelog will highlight that. It might also be worth a shot when troubleshooting update issues.
To update each SharePoint site to the latest WikiPakk version proceed as follows.
As site owner, or site collection administrator of the respective sites:
- In a browser, navigate to a SharePoint site that uses WikiPakk
- In this site, navigate to Site Contents
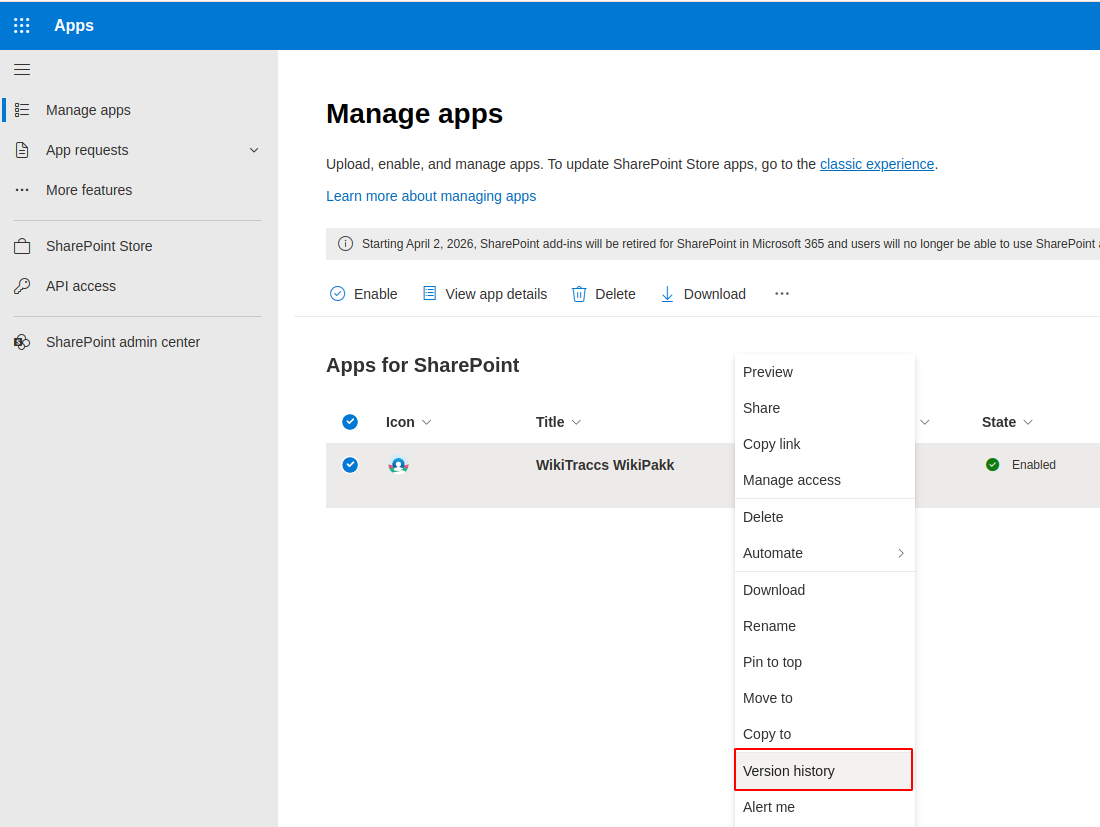
- For the WikiTraccs WikiPakk app, choose … > Details:
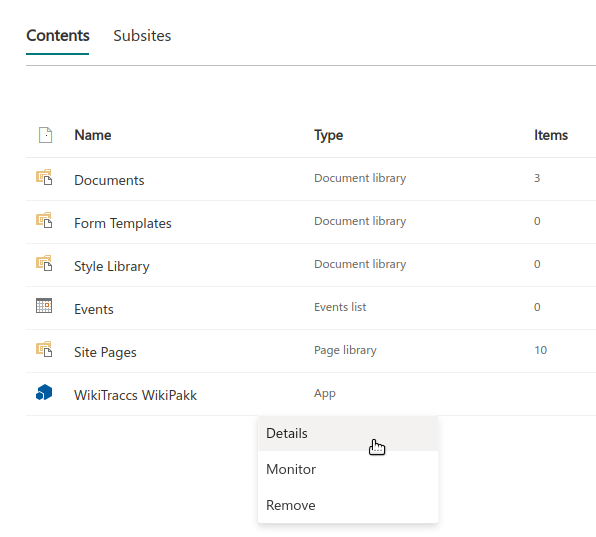
- Choose GET IT to update the app:
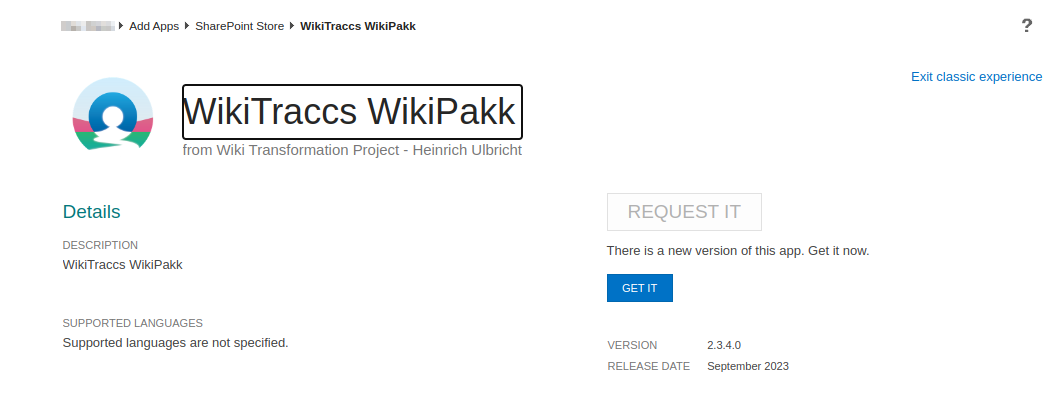
After a moment, you will be redirected back to Site Contents. The WikiTraccs WikiPakk app title might display in gray, indicating that the update is still in progress.
After a while (and you might have to refresh the page manually) the app title should display in black, indicating that SharePoint finished updating the app.
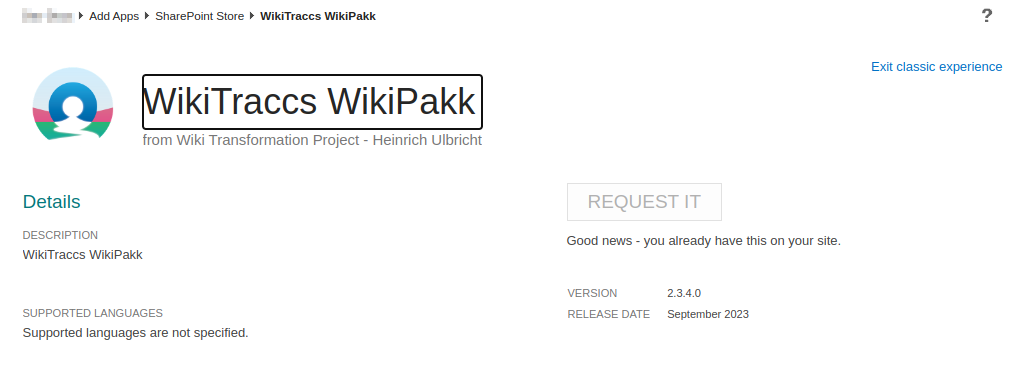
For the app, select … > Details again. It should now read Good news - you already have this on your site.
Note: this process can be automated, e.g. with the CLI for Microsoft 365.
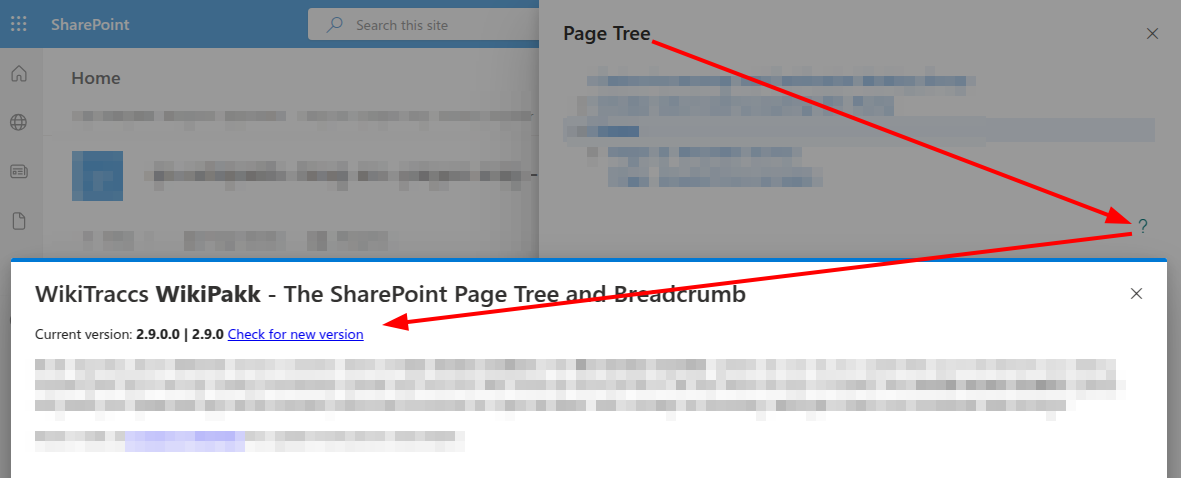
You can see the app version as well in WikiPakk as follows (also illustrated here):
- Select Page Tree to expand the page tree panel on the right side
- Select the ? that is displayed at the bottom of the page tree; a window opens
- The app version is shown right at the top
If the version shown here is lower than the one of the app you just installed, proceed reading the next section about Caching ssues.
Caching issues
There is one rather ugly behavior when updating SharePoint apps. Sometimes the browser caches old resources rather aggressively, making the app appear being older for users.
This is the case when the version number in the ? dialog of WikiPakk shows a lower version number than the app’s version number.
To solve this different strategies helped different clients:
- Pressing F5 to reload the page
- Clearing the browser cache
- Deleting all service workers via the F12 developer tools
This has to be done in all browsers where caching issues occur.
3 - Update WikiPakk (staged)
How to update WikiPakk with staging
This article shows how to install an update of WikiPakk to a staging site collection, before rolling out the update to the whole tenant.
This process is different (and has more steps) than the update instructions that don’t involve staging.
Steps Overview
This article describes the following steps:
- Create a staging site and activate the site collection app catalog
- Install the current WikiPakk app package to the staging site
- Add the WikiPakk app to the staging site
- Get the latest WikiPakk update from AppSource and install it to the staging site
While all steps are necessary for setting up the staging site, steps 1 to 3 might be skipped if you reuse the staging site for future WikiPakk updates.
Step 1: Create a staging site and activate the site collection app catalog
Permissions
You need an account that is site collection administrator of the tenant app catalog site and SharePoint administrator.- Create a new site that will be used for staging
- Note: in this article we’ll assume the staging site has the name wikipakk-staging and its addresss is https://contoso.sharepoint.com/sites/wikipakk-staging.
- Using PowerShell, create a site collection app catalog
- Here’s a sample script that uses the PnP.PowerShell module to create the site collection app catalog:
# make sure to install PnP.PowerShell and use PowerShell 7.x
# Install-Module PnP.PowerShell -Scope CurrentUser

# use an account that has admin permissions on the tenant app catalog site; note that even when using a tenant admin account you might have to first grant them those permissions; also, connect to the -admin endpoint, otherwise the cmdlet will complain; it also seems that you need to be SharePoint admin to make this connection, though I am not entirely sure about that
Connect-PnPOnline https://contoso-admin.sharepoint.com -Interactive
# this adds the site collection app catalog; note that it can take a couple of minutes until this is fully functional, but it might also work instantly
Add-PnPSiteCollectionAppCatalog -Site "https://contoso.sharepoint.com/sites/wikipakk-staging"
- Here’s a sample script that uses the PnP.PowerShell module to create the site collection app catalog:
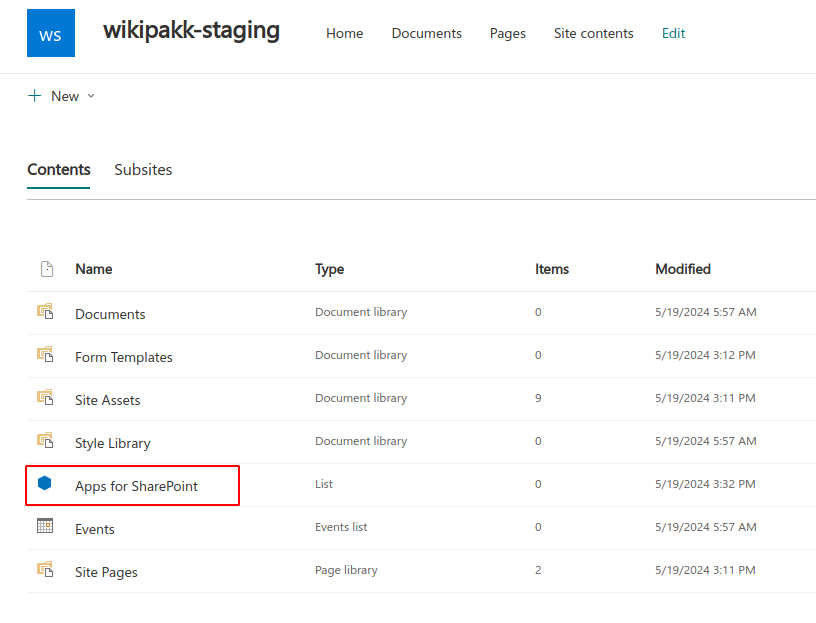
- The Site Contents of the staging site should now show the Apps for SharePoint library:
Add account to site collection administrators of the tenant app catalog.
Troubleshooting
If you don’t connect to the -admin endpoint, or miss permissions on that level, the following error will be shown:
Add-PnPSiteCollectionAppCatalog: Unable to connect to the SharePoint Online Admin Center at ‘https://contoso-admin.sharepoint.com’ to run this cmdlet. Please ensure you pass in the correct Admin Center URL using Connect-PnPOnline -TenantAdminUrl and you have access to it. Error message: Attempted to perform an unauthorized operation..
If you lack permissions on the tenant app catalog site the following error will be shown:
Add-PnPSiteCollectionAppCatalog: Attempted to perform an unauthorized operation.
Here’s how to add an account to the tenant app catalog site’s admin list:
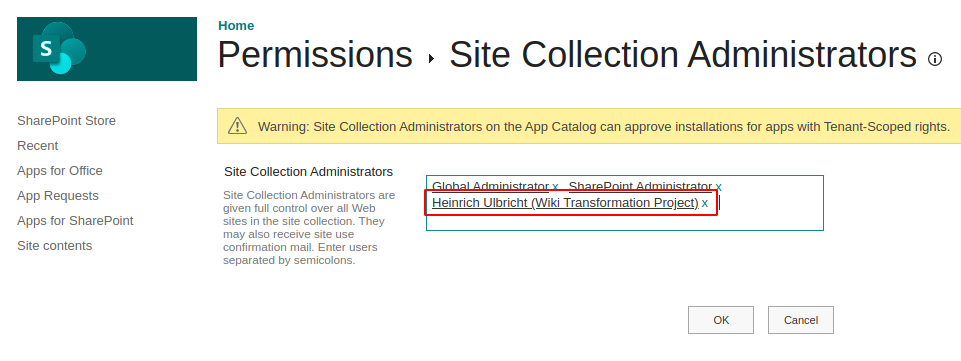
Add account to site collection administrators of the tenant app catalog.
Step 2: Install the current WikiPakk package to the staging site
We need to get the current WikiPakk app package to add it to the staging site.
- Open the tenant app catalog site
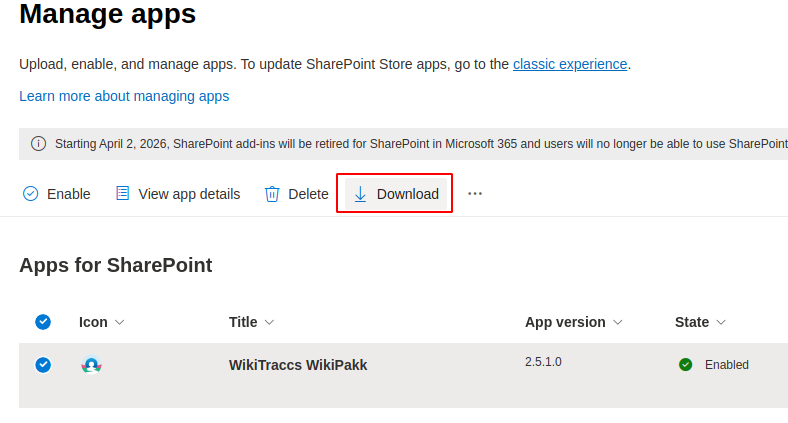
- Open the Apps for SharePoint library in the tenant app catalog site
- Download the current version of WikiPakk:Note: this downloads a WA200005439.cab file
Add account to site collection administrators of the tenant app catalog.
- Extract the cab file you downloaded in the previous step; it contains a single sppkg file like f82ae112018660069bacdf301eca7f1c.sppkg
- note: a cab file is an archive like a zip file; the cab file format is mostly used by Microsoft; you might need additional tools to extract that cab file, depending on your operating system
- Open the staging site
- Open the Apps for SharePoint library in the staging site
- Deploy the sppkg file to the Apps for SharePoint library:
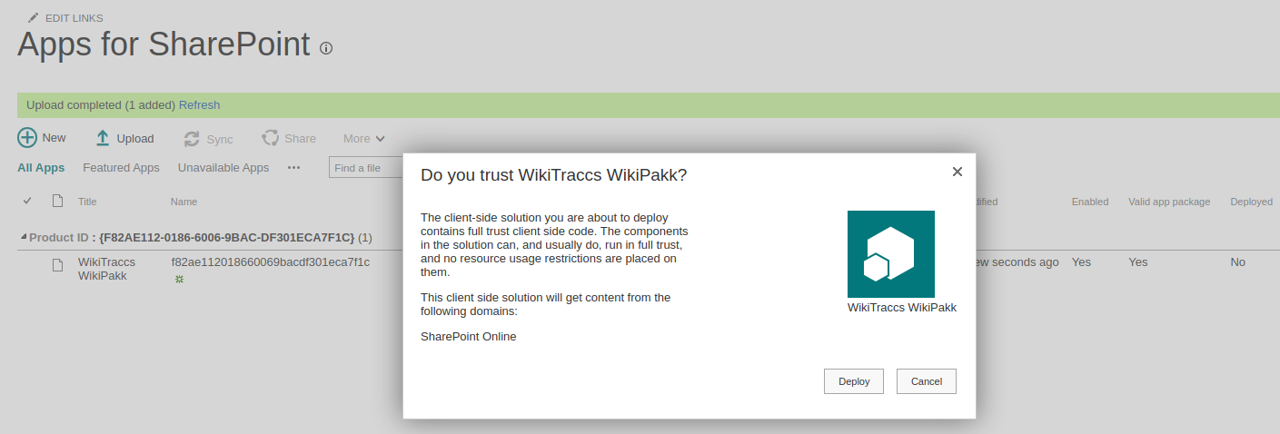
- Check that the Enabled column shows Yes, the Deployed column shows Yes, and the App package error message column shows No errors.
Step 3: Add WikiPakk to the staging site
Now that WikiPakk has been deployed to the “local app store” (the site collection app catalog), the app can be added to the staging site.
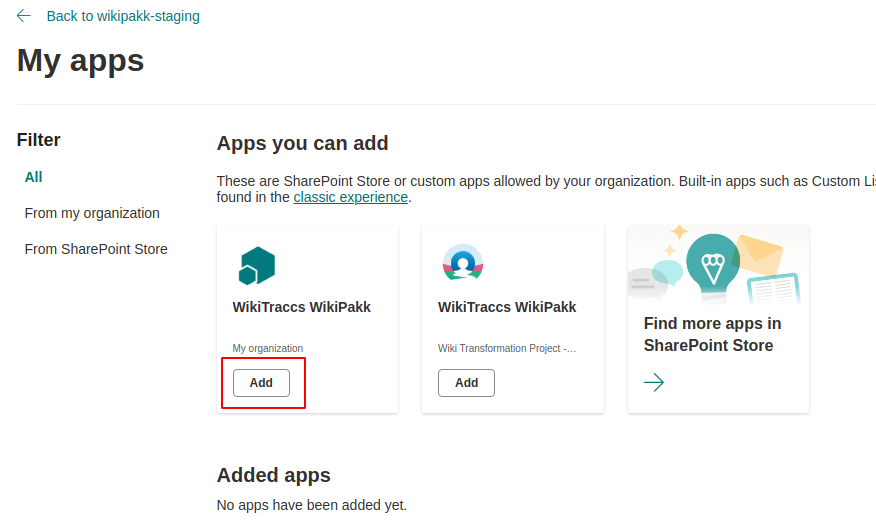
- As site owner, open the home page of the staging site
- Click the + New button, then click App to add an app
- You now have two WikiPakk apps to choose from: one with a proper app icon (from the tenant app catalog) and one with a generic icon (from the staging site); click Add for the WikiPakk app with the generic icon:
- Now wait a minute and go back to the staging site’s home page
- The Page Tree button should be visible in the upper right corner; click that Page Tree button to expand the page tree panel, then click the ? in the page tree panel to have a look at the WikiPakk version:

Good, we are now ready to update.
Step 4: Get the latest WikiPakk release from AppSource
The site collection app catalog does not allow us to update the app from AppSource. We thus have to get the lates WikiPakk app package ourselves.
- Enter the following address in your browser address bar and press Return: https://addinsinstallation.store.office.com/app/download?assetid=WA200005439
- note: this address is the same address SharePoint uses to get the latest release when updating the app in the tenant app catalog
- note: this should download a cab file like Roq9de20691-b34e-410d-a96c-641f230268e9_f82ae112018660069bacdf301eca7f1c.cab
- Proceed with this cab file as described in above section Step 2: Install the current WikiPakk package to the staging site, steps 4 to 8; you’ll extract the cab, get a sppkg, upload that to the app catalog and deploy the app
Check that the app has a new version:

Now check the page tree version as well:
That’s it. That was the update. You can now test the update in the staging site.
Note about subsequent updates
Once the staging site is in place, you can reuse it for subsequent updates. This means that above steps 1 to 3 don’t have to be repeated. It’s just step 4 - the actual update - that has to be done.
But you can always discard the staging site and start from scratch.
Wrap-up
In this article we prepared a staging site for WikiPakk updates.
We downloaded the current (old) release of WikiPakk that is currently installed in the SharePoint tenant app catalog. We installed this old release in the staging site.
We then downloaded the latest WikiPakk release from AppSource and updated the WikiPakk app in the staging site.
As result, we have an updated WikiPakk app in the staging site. All other sites in the tenant still use the old WikiPakk releaes from the tenant app catalog.
This allows us to test WikiPakk updates in the staging site before rolling it out to the whole tenant.
4 - Check the Current and Available Version of WikiPakk
Where to find the current version number of WikiPakk, and how to check if a new version is available.
Which Version of WikiPakk Am I Using?
To see the current version of WikiPakk, expand the Page Tree panel and click the question mark button.
The dialog that opens shows the current WikiPakk version, here 2.9.0:
How to Check for WikiPakk Updates?
To check for updates, click the Check for new version link (see screenshot in previous section).
Note: If there is no “Check for new version” link, you might be running an older version of WikiPakk that doesn’t have the link, yet. In that case, please check the release notes on Microsoft AppSource.
5 - Rolling back an update of WikiPakk
How to roll back an update of WikiPakk
Rolling back an update
You can easily roll back an update and revert to a previous version.
In the SharePoint tenant app catalog, open the Apps for SharePoint library. This library has versioning enabled.
Find the WikiPakk app in the library and revert it back to a previous version, using the out-of-the-box SharePoint version history.
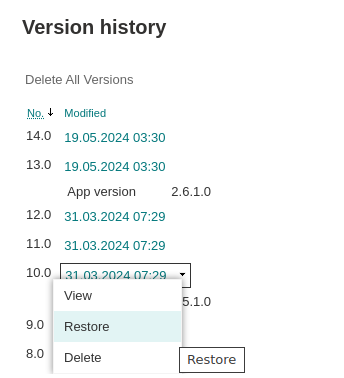
The rollback is effective immediately for all sites WikiPakk has been added to.
6 - WikiPakk Configuration
How to configure WikiPakk
6.1 - Use a Configuration Site
How to set up and use a WikiPakk configuration site.
Dedicate a site to WikiPakk, to
- store the WikiPakk license key,
- configure WikiPakk settings, and
- store optional telemetry data.
The configuration site will contain lists supporting those tasks.
Find more information in the following sections where - as a sample - you’ll set up https://COMPANY.sharepoint.com/sites/wikipakk-config as dedicated configuration site.
Setting up the WikiPakk Configuration Site
Create a new SharePoint site, or choose an existing one.
Important
Make sure all users of WikiPakk have read access to the configuration site, otherwise the license key and settings cannot be read.Point WikiPakk to the configuration site via a SharePoint storage entity (a.k.a tenant property).
One option to set a storage entity is via PnP PowerShell.
You need:
- PowerShell 7
- with the PowerShell module PnP.PowerShell installed
- a user account that is in the Owners group of the tenant app catalog site (or site collection admin there)
Here’s a script that will connect to SharePoint and set the storage entity used by WikiPakk:
Configuration Note
Make sure to replace “COMPANY.sharepoint.com” with your SharePoint tenant host.Connect-PnPOnline `
-Url https://COMPANY.sharepoint.com `
-Interactive # ^ use any other site if you don't have access to the root site
Set-PnPStorageEntity `
-Key "wikipakk.licensesiteurl" `
-Value "https://COMPANY.sharepoint.com/sites/wikipakk-config" `
-Description "WikiPakk configuration, where to find the current license key" `
-Scope Tenant
# Get-PnPStorageEntity # <- use this to list all configured storage entities
License Key Storage and Lookup
After you set up the configuration site, WikiPakk will look for the license key in the description field of the Site Pages library of (in our sample) site https://COMPANY.sharepoint.com/sites/wikipakk-config (in addition to two other locations; read more about license key storage here: WikiPakk Licensing).
There is one drawback to using the description field of the Site Pages library: it is localized. Localization and SharePoint is a tricky topic and the license key might be invible to users with certain profile languages if it differs from the default language of the configuration site. If that is a concern create a WikiPakk settings list and use the wikipakk.license setting as documented in the next sections.
WikiPakk Settings
After you set up the configuration site, you can use WikiPakk to create a settings list, to configure aspects of WikiPakk.
Create a settings list as follows:
- open the configuration site in the browser; make sure you have site owner permissions
- add WikiPakk to the configuration site
- navigate to the home page of the configuration site; wait a moment for WikiPakk to appear; refresh the page a couple of times until the Page Tree button appears
- click the Page Tree button in the upper right corner, to show the page tree panel
- in the page tree panel, below the page tree, click the question mark ? to open the About dialog
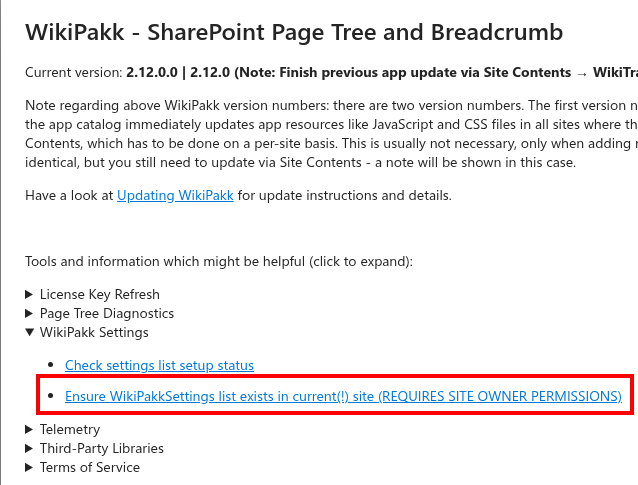
- in the About dialog, click WikiPakk Settings, then click Check settings list setup status to verify that the list is not yet set up
- note: if the settings list is already set up, click View Settings List to navigate to the settings list and skip the next setp
- click Ensure WikiPakkSettings list exists in current(!) site (REQUIRES SITE OWNER PERMISSIONS) - this will create the settings list:
- after creating the settings list, open Site Contents of the configuration site - it should now show the WikiPakkSettings list:

In our sample, the path should be https://COMPANY.sharepoint.com/sites/wikipakk-config/Lists/WikiPakkSettings.
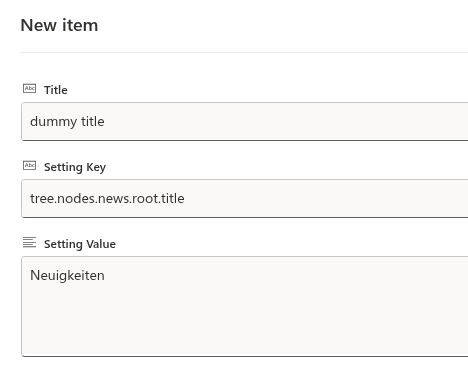
To use a setting, add a new list item to the WikiPakkSettings list.
Use one of the above settings keys as Setting Key and set the Setting Value as well, here to change the label of the News node to German:
Tutorial Video
There’s a tutorial video available showing how to use the settings list. Have a look at the following blog post: SharePoint Page Tree Groups News Posts by Date.Caching Note
Settings are cached up to 24 hours by WikiPakk. Thus, after changing a setting, it will take up to 24 hours for the setting to take effect.
You can speed that up by clearing the browser cache, or (using the browser’s developer tools) deleting the local storage entry wikipakk.settings:
Settings Reference
The following settings are available:
News Node Settings
| Setting Key | Description | Default | Example Value |
|---|---|---|---|
tree.nodes.news.root.title | Change the title of the News tree node. Max 50 characters. | News 📰 | Aktuelles |
tree.nodes.news.enable | Show or hide the News tree node. Accepted falsy values: 0, no, off, false, nein, falsch, aus. | true | false |
Read more about News node configuration: News Node.
Page Tree Panel Settings
| Setting Key | Description | Default | Example Value |
|---|---|---|---|
tree.panel.openFrom | Set to left to move the page tree button and panel to the left side of the page. | right | left |
tree.panel.opened.isBlocking | (Experimental) Whether the opened panel blocks interaction with the page behind it. Set to a falsy value (0, false, no, off) to make the panel non-blocking. | true | false |
tree.panel.opened.awaySlidePercent | (Experimental) When the panel is non-blocking, this controls how far the panel slides off-screen when the mouse leaves it (as a percentage, 0–100). Only takes effect when tree.panel.opened.isBlocking is falsy. | (no slide) | 80 |
Page Tree Button Position Settings
| Setting Key | Description | Default | Example Value |
|---|---|---|---|
tree.button.position | Controls how the page tree button is positioned. Set to fixed to anchor it on an arbitrary page element (configured via tree.button.position.css). Set to float to position it below a matched element. | default | fixed |
tree.button.position.css | (Experimental) Defines where to anchor the button when tree.button.position is fixed or float. Each line specifies a CSS selector, optionally followed by top, left, or right offsets separated by |. Multiple lines act as fallback candidates (first match wins). | (none) | (see below) |
tree.button.position.css examples:
Anchor the button inside an element matched by a CSS selector, with offsets:
#pageHeader | top: 8px | right: 16px
Provide multiple fallback selectors (one per line). The first matched element wins:
[data-automation-id="PageHeader"] | top: 8px | right: 16px
.mainContent | top: calc(10px + 1vh) | left: 12px
Offsets support CSS calc() expressions. Available offset properties are top, left, and right.
Page Behavior Settings
| Setting Key | Description | Default | Example Value |
|---|---|---|---|
pages.duplicatedetection.enabled | Enable or disable detection and indication of duplicate (copied) pages. Accepted falsy values: 0, no, off, false, nein, falsch, aus. | true | false |
CSS Setting
| Setting Key | Description | Default | Example Value |
|---|---|---|---|
wikipakk.css | Define custom CSS that will be loaded into every site where WikiPakk is active. Use this to style or hide WikiPakk elements or to make other visual adjustments. | (none) | (see below) |
wikipakk.css example — hide the page tree button on small screens:
@media (max-width: 768px) {
  [data-testid="wikipakk-page-tree-button"] {
    display: none !important;
  }
}
License Setting
| Setting Key | Description | Default | Example Value |
|---|---|---|---|
wikipakk.license | Store the WikiPakk license key directly as a setting. This is an alternative to storing the license in a Site Pages library page. | (none) | (your license key) |
Telemetry
If you choose to opt into collecting telemetry data, it will be stored in the configuration site.
Refer to the Telemetry documentation for details.
6.2 - How to use the settings list and move the page tree button to the left
How to set up the settings list and move the SharePoint page tree button to the left
This video shows how to configure WikiPakk to show the SharePoint page tree button and panel on the left side of the page, instead of the default right side. It also demonstrates an advanced configuration that moves the SharePoint page tree button out of the top bar entirely and anchors it on an arbitrary element within the page, such as the page title area.
Video Sections
- 00:00 Intro
- 00:33 Adding WikiPakk to a site and waiting for the page tree button to appear in the upper right corner.
- 00:58 Creating the WikiPakk settings list in the WikiPakk configuration site (
/sites/WikiPakkConfiguration). WikiPakk provides a helper to create the list via the ? dialog in the page tree panel. - 02:43 Configuring WikiPakk to show the button on the left by adding a setting with key
tree.panel.openFromand valueleft. - 03:15 Clearing the settings cache via the browser developer tools (F12 > Application > Local Storage > delete the
wikipakk.settingsentry) to apply changes immediately, instead of waiting for the cache to expire. - 04:09 Seeing the button on the left side - the button and panel now slide out from the left.
- 04:28 Advanced: anchoring the button in the page title area using two additional settings (see Settings Reference):
tree.button.positionwith valuefixedtree.button.position.csswith CSS selectors to find the target element, plus margin definitions
- 06:26 Seeing the button in the title area and words of caution - anchoring the button on page elements requires CSS knowledge. Since those elements are owned by Microsoft, they can change with SharePoint updates. If the target element cannot be found, the button falls back to its default top bar position.
- 07:18 Outro
6.3 - Applying Custom Styles
How to apply custom styles to WikiPakk components?
WikiTraccs allows you to change its style by applying custom CSS.
Note
You should only continue if you know about CSS and how to use it.
By applying custom CSS, you might introduce unwanted side effects. Your CSS will be loaded into the pages where the page tree and breadcrumb is shown and can also affect components owned by SharePoint like menus, lists, and document libraries.
Make sure to scope your CSS to WikiPakk components and to test your configuration thoroughly.
Do the following to load your custom CSS:
- Set up a Configuration Site
- note: see Use a Configuration Site for details
- Create the WikiPakkSettings list in the Configuration Site
- note: see WikiPakk Settings for details
- Add the
wikipakk.csssetting key; set its value to the custom CSS selectors you want to apply- note: see the Settings Reference section for details; also take note of the settings cache duration
After the settings cache expires (or you manually clear it), your custom CSS should be applied.
7 - Inventorize WikiPakk
How to get a complete list of sites that use WikiPakk
There is a script for that in the library: WikiPakkInventory.ps1.
This script will check all sites for WikiPakk.
8 - How to Set Up Telemetry
How to set up telemetry to track usage
Note: Telemetry configuration is available as of WikiPakk 2.9.0.
How to Turn on Usage Tracking
The following eight-minute video will walk you through:
- setting up a central configuration site to store the data
- pointing WikiPakk to this central location
- creating the SharePoint list that is used to store the data
- watching recorded usage events
Configuration Site Setup
Learn how to set up the configuration site: Configuration Site.Note
Your central configuration site might already have been configured if you chose to store your WikiPakk license key there.Access and Permissions Overview
Let’s take a quick look at the permission configuration involved when setting up usage tracking.
- Central Configuration Site
- READ ACCESS for all WikiPakk users
- the site is not only used to store metrics, but also to store the license key centrally and - in the future - further WikiPakk settings
- WikiPakkTelemetry list in the central configuration site
- CONTRIBUTE ACCESS for all WikiPakk users
- permission inheritance must be broken MANUALLY to allow that, otherwise users won’t be able to contribute their metrics; you might also use that to only record metrics for specific groups of users
- the list must be configured so that each user can only see their own list items; WikiPakk takes care of configuring this, but you should double check that in the list settings
Configuration Site Setup
Learn how to set up the configuration site: Configuration Site.What You Need to Configure
Here is what you need to do, with regard to permissions:
- grant read access to all WikiPakk users to the central configuration site
- grant Contribute access to all WikiPakk users to the WikiPakkTelemetry list in the central configuration site; you need to break permission inheritance on the list
Here is what WikiPakk already does, but what you should double-check:
- create the WikiPakkTelemetry list (see video on how to do that)
- configure the WikiPakkTelemetry list so that each user can only see their own list items
Configuration Site Setup
Learn how to set up the configuration site: Configuration Site.Where Is Usage Data Stored?
The usage data is stored in the WikiPakkTelemetry list in the central configuration site, in your SharePoint Tenant.
Maintenance
Depending on WikiPakk usage, the WikiPakkTelemetry list might get very large. Usability of SharePoint lists degrades starting at 5000 list items, although SharePoint can handle millions of list items.
Nevertheless, you should delete old usage data regularely.
How to Turn off Telemetry and Usage Tracking?
Delete the WikiPakkTelemetry list. (You can re-create it at any time, following the instructions in the setup video.)