This is the multi-page printable view of this section. Click here to print.
WikiPakk Configuration
1 - Use a Configuration Site
Dedicate a site to WikiPakk, to
- store the WikiPakk license key,
- configure WikiPakk settings, and
- store optional telemetry data.
The configuration site will contain lists supporting those tasks.
Find more information in the following sections where - as a sample - you’ll set up https://COMPANY.sharepoint.com/sites/wikipakk-config as dedicated configuration site.
Setting up the WikiPakk Configuration Site
Create a new SharePoint site, or choose an existing one.
Important
Make sure all users of WikiPakk have read access to the configuration site, otherwise the license key and settings cannot be read.Point WikiPakk to the configuration site via a SharePoint storage entity (a.k.a tenant property).
One option to set a storage entity is via PnP PowerShell.
You need:
- PowerShell 7
- with the PowerShell module PnP.PowerShell installed
- a user account that is in the Owners group of the tenant app catalog site (or site collection admin there)
Here’s a script that will connect to SharePoint and set the storage entity used by WikiPakk:
Configuration Note
Make sure to replace “COMPANY.sharepoint.com” with your SharePoint tenant host.Connect-PnPOnline `
-Url https://COMPANY.sharepoint.com `
-Interactive # ^ use any other site if you don't have access to the root site
Set-PnPStorageEntity `
-Key "wikipakk.licensesiteurl" `
-Value "https://COMPANY.sharepoint.com/sites/wikipakk-config" `
-Description "WikiPakk configuration, where to find the current license key" `
-Scope Tenant
# Get-PnPStorageEntity # <- use this to list all configured storage entities
License Key Storage and Lookup
After you set up the configuration site, WikiPakk will look for the license key in the description field of the Site Pages library of (in our sample) site https://COMPANY.sharepoint.com/sites/wikipakk-config (in addition to two other locations; read more about license key storage here: WikiPakk Licensing).
There is one drawback to using the description field of the Site Pages library: it is localized. Localization and SharePoint is a tricky topic and the license key might be invible to users with certain profile languages if it differs from the default language of the configuration site. If that is a concern create a WikiPakk settings list and use the wikipakk.license setting as documented in the next sections.
WikiPakk Settings
After you set up the configuration site, you can use WikiPakk to create a settings list, to configure aspects of WikiPakk.
Create a settings list as follows:
- open the configuration site in the browser; make sure you have site owner permissions
- add WikiPakk to the configuration site
- navigate to the home page of the configuration site; wait a moment for WikiPakk to appear; refresh the page a couple of times until the Page Tree button appears
- click the Page Tree button in the upper right corner, to show the page tree panel
- in the page tree panel, below the page tree, click the question mark ? to open the About dialog
- in the About dialog, click WikiPakk Settings, then click Check settings list setup status to verify that the list is not yet set up
- note: if the settings list is already set up, click View Settings List to navigate to the settings list and skip the next setp
- click Ensure WikiPakkSettings list exists in current(!) site (REQUIRES SITE OWNER PERMISSIONS) - this will create the settings list:
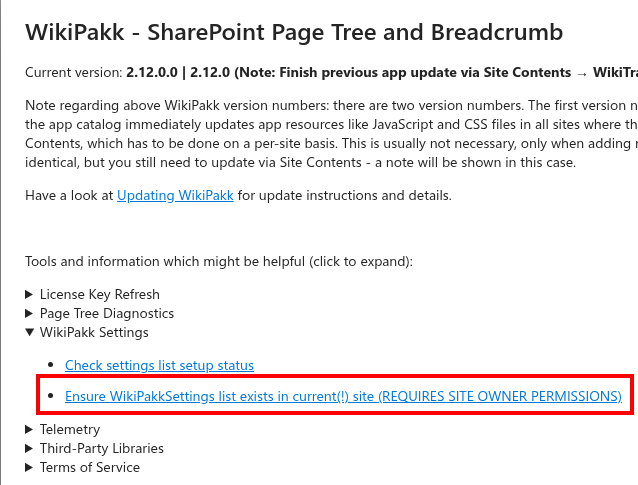
- after creating the settings list, open Site Contents of the configuration site - it should now show the WikiPakkSettings list:

In our sample, the path should be https://COMPANY.sharepoint.com/sites/wikipakk-config/Lists/WikiPakkSettings.
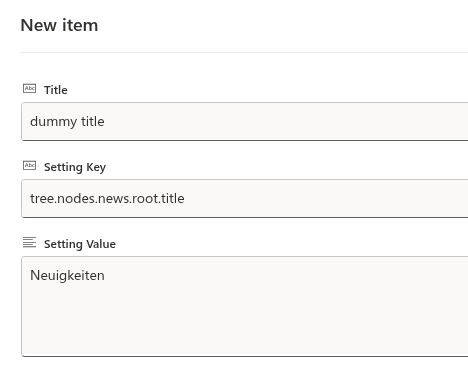
To use a setting, add a new list item to the WikiPakkSettings list.
Use one of the above settings keys as Setting Key and set the Setting Value as well, here to change the label of the News node to German:
Tutorial Video
There’s a tutorial video available showing how to use the settings list. Have a look at the following blog post: SharePoint Page Tree Groups News Posts by Date.Caching Note
Settings are cached up to 24 hours by WikiPakk. Thus, after changing a setting, it will take up to 24 hours for the setting to take effect.
You can speed that up by clearing the browser cache, or (using the browser’s developer tools) deleting the local storage entry wikipakk.settings:
Settings Reference
The following settings are available:
News Node Settings
| Setting Key | Description | Default | Example Value |
|---|---|---|---|
tree.nodes.news.root.title | Change the title of the News tree node. Max 50 characters. | News 📰 | Aktuelles |
tree.nodes.news.enable | Show or hide the News tree node. Accepted falsy values: 0, no, off, false, nein, falsch, aus. | true | false |
Read more about News node configuration: News Node.
Page Tree Panel Settings
| Setting Key | Description | Default | Example Value |
|---|---|---|---|
tree.panel.openFrom | Set to left to move the page tree button and panel to the left side of the page. | right | left |
tree.panel.opened.isBlocking | (Experimental) Whether the opened panel blocks interaction with the page behind it. Set to a falsy value (0, false, no, off) to make the panel non-blocking. | true | false |
tree.panel.opened.awaySlidePercent | (Experimental) When the panel is non-blocking, this controls how far the panel slides off-screen when the mouse leaves it (as a percentage, 0–100). Only takes effect when tree.panel.opened.isBlocking is falsy. | (no slide) | 80 |
Page Tree Button Position Settings
| Setting Key | Description | Default | Example Value |
|---|---|---|---|
tree.button.position | Controls how the page tree button is positioned. Set to fixed to anchor it on an arbitrary page element (configured via tree.button.position.css). Set to float to position it below a matched element. | default | fixed |
tree.button.position.css | (Experimental) Defines where to anchor the button when tree.button.position is fixed or float. Each line specifies a CSS selector, optionally followed by top, left, or right offsets separated by |. Multiple lines act as fallback candidates (first match wins). | (none) | (see below) |
tree.button.position.css examples:
Anchor the button inside an element matched by a CSS selector, with offsets:
#pageHeader | top: 8px | right: 16px
Provide multiple fallback selectors (one per line). The first matched element wins:
[data-automation-id="PageHeader"] | top: 8px | right: 16px
.mainContent | top: calc(10px + 1vh) | left: 12px
Offsets support CSS calc() expressions. Available offset properties are top, left, and right.
Page Behavior Settings
| Setting Key | Description | Default | Example Value |
|---|---|---|---|
pages.duplicatedetection.enabled | Enable or disable detection and indication of duplicate (copied) pages. Accepted falsy values: 0, no, off, false, nein, falsch, aus. | true | false |
CSS Setting
| Setting Key | Description | Default | Example Value |
|---|---|---|---|
wikipakk.css | Define custom CSS that will be loaded into every site where WikiPakk is active. Use this to style or hide WikiPakk elements or to make other visual adjustments. | (none) | (see below) |
wikipakk.css example — hide the page tree button on small screens:
@media (max-width: 768px) {
  [data-testid="wikipakk-page-tree-button"] {
    display: none !important;
  }
}
License Setting
| Setting Key | Description | Default | Example Value |
|---|---|---|---|
wikipakk.license | Store the WikiPakk license key directly as a setting. This is an alternative to storing the license in a Site Pages library page. | (none) | (your license key) |
Telemetry
If you choose to opt into collecting telemetry data, it will be stored in the configuration site.
Refer to the Telemetry documentation for details.
2 - How to use the settings list and move the page tree button to the left
This video shows how to configure WikiPakk to show the SharePoint page tree button and panel on the left side of the page, instead of the default right side. It also demonstrates an advanced configuration that moves the SharePoint page tree button out of the top bar entirely and anchors it on an arbitrary element within the page, such as the page title area.
Video Sections
- 00:00 Intro
- 00:33 Adding WikiPakk to a site and waiting for the page tree button to appear in the upper right corner.
- 00:58 Creating the WikiPakk settings list in the WikiPakk configuration site (
/sites/WikiPakkConfiguration). WikiPakk provides a helper to create the list via the ? dialog in the page tree panel. - 02:43 Configuring WikiPakk to show the button on the left by adding a setting with key
tree.panel.openFromand valueleft. - 03:15 Clearing the settings cache via the browser developer tools (F12 > Application > Local Storage > delete the
wikipakk.settingsentry) to apply changes immediately, instead of waiting for the cache to expire. - 04:09 Seeing the button on the left side - the button and panel now slide out from the left.
- 04:28 Advanced: anchoring the button in the page title area using two additional settings (see Settings Reference):
tree.button.positionwith valuefixedtree.button.position.csswith CSS selectors to find the target element, plus margin definitions
- 06:26 Seeing the button in the title area and words of caution - anchoring the button on page elements requires CSS knowledge. Since those elements are owned by Microsoft, they can change with SharePoint updates. If the target element cannot be found, the button falls back to its default top bar position.
- 07:18 Outro
3 - Applying Custom Styles
WikiTraccs allows you to change its style by applying custom CSS.
Note
You should only continue if you know about CSS and how to use it.
By applying custom CSS, you might introduce unwanted side effects. Your CSS will be loaded into the pages where the page tree and breadcrumb is shown and can also affect components owned by SharePoint like menus, lists, and document libraries.
Make sure to scope your CSS to WikiPakk components and to test your configuration thoroughly.
Do the following to load your custom CSS:
- Set up a Configuration Site
- note: see Use a Configuration Site for details
- Create the WikiPakkSettings list in the Configuration Site
- note: see WikiPakk Settings for details
- Add the
wikipakk.csssetting key; set its value to the custom CSS selectors you want to apply- note: see the Settings Reference section for details; also take note of the settings cache duration
After the settings cache expires (or you manually clear it), your custom CSS should be applied.